Saturday, March 29, 2008
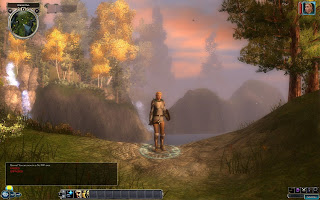
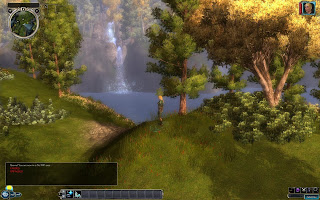
Sneak Peek of Unicorn Run
I wanted to give you a sneak peek of the area I am currently working on called Unicorn Run... I am entering it into the area design contest if I ever get it finished in time! :)
I will be using this area in "A Time to Die Act III: Kraken's Tentacles" for one of the main side quests in that Act. I've also added a few more screenies from A Time to Die and Unicorn Run at my DeviantArt account: http://ladyelvenstar.deviantart.com
in addition to the ones at my Picasa pic account http://picasaweb.google.com/elmeida
UPDATE: March 30, 2008
Well, I have finished the area and have submitted it to the Vault - now I just have to wait for it to be approved... :)
UPDATE: March 31, 2008
It's approved! You can find Unicorn Run at:
http://nwvault.ign.com/View.php?view=NWN2PrefabAreas.Detail&id=325
Keep in mind that it is uncharted territory so it takes a bit of work to trek through the wild lands of Unicorn Run! A special thanks to my fellow GPS members for all their support while I worked on the area and for Daronas for making me a Unicorn for the area. Much appreciated! ;)
Tuesday, March 18, 2008
A Time to Die Progress
Just a quick note to let you know that I created a new thread on the NWN2 forums on the progress with "A Time to Die" today.
Here's the link to the forum...feel free to post your comments!
http://nwn2forums.bioware.com/forums/myviewtopic.html?topic=622544&forum=111
Here's the link to the forum...feel free to post your comments!
http://nwn2forums.bioware.com/forums/myviewtopic.html?topic=622544&forum=111
Wednesday, March 12, 2008
Quick Tutorial on Creating Haks and Erfs
I was asked how to create a hak, so I thought I would share the steps here in a quick tutorial.
We will be using Tanita's NWN2Packer on the Vault. Once you have downloaded and installed the NWN2Packer according to Tanita's Readme, open the program:
1. Click on the green "new" button on the left.
2. Click on the blue "import" button on the left.
3. Select all the files that you would like to include in your hak (can be dds, mdb, etc.)
4. Click on the purple "save as" button and name the file with the .hak extension
And that's it! You can include 2da files in your hak, but you make want to mention it to anyone downloading your hak... it may throw off the 2da files already in someone's computer.
Please note that there are some blueprints that won't work in a hak as far as builders are concerned, this would need to be saved as an .erf file and imported directly into the toolset. This is a concern for builders, not players. :)
Part Two: Associating your new hak pak with a module.
1. Open up your module file in the toolset
2. Go to "View - Module Properties" (very top toolbar of toolset)
3. There is a spot there to add the hak, listed under properties as "hak paks"
4. Click on the "hak paks", a button with three dots "..." shows up. Click on the button and a new window pops up.
5. Click on the "add" button and then the button with "..." near the "Filename". Look for your hak from the directory where you saved it.
6. Once you have selected the hak, hit the "Okay" button to finalize the hak selection.
7. Save your module.
Your hak files might not show up until the next time you load the module...
Update #1: Erf files
Erf files are perfect when you need to import files such as mdb's and blueprints into your module from custom content makers. You could also use them to transfer one of your areas into another module. To export an area, choose "File - Export" and select the files you would like to extract from your module, then the toolset will save them all as an erf file. (It is a good way to keep an extra backup of important files such as dialog).
You can also create an .erf file using the exact same procedure as above for creating a hak using the NWN2Packer, except in step 4 where you are saving as .hak, you would save as .erf instead.
You would skip the steps where you would need to associate the file to your module though. Erfs are imported into a module using a different method. Simply open your module in the toolset, go to "File - Import" and choose your erf file that you have downloaded from the Vault or the one you have created and it will be imported. Once the import is finished, the toolset usually lets you know how many files have been imported to your module.
Sunday, March 9, 2008
NWNP Episode 46: Developers Round Table
The Neverwinter Nights Podcast team brought together a group of builders, including myself, to share their ideas on module building and the Toolset for NWN2. The Developer's Round Table has now been posted at their site and you are welcome to listen in! But...don't make fun of my Canadian accent! LOL...
I enjoyed chatting with Delak, ENoa4, Raith Veldrin, Nalencer, and Wyrin as well as Amraphael for a few minutes before he had technical difficulties. Thanks, Liso for all your hard work on organizing the Podcast and for jclef for editing all of it! :)
Monday, March 3, 2008
First Mini-Trailer of A Time to Die
I've created my first video of the A Time To Die campaign - it is a small video of a few minutes where the player runs and fights throughout Red Larch in Chapter One. I wanted to see how easy it would be to make a video trailer. I used Fraps (fraps.com) for the initial video capture and then used Windows Movie Maker to compress and edit the movie file. I uploaded it to YouTube.com and embedded the code here so you can watch the video. Only took me a whole day to figure out how to do this, thanks to Amraphael and Ayrin on the forums for their advice.! :)
** Update! I discovered how to record the video with sound, here is an updated video trailer below **
Saturday, March 1, 2008
Ladyelvenstar Enters NWN2 Contest...
The NWN2 team is having a new contest at the Vault for area design and I've decided to enter! I will be putting my work on my module on hold for a little while - in order to design a completely new area for the contest.
I am using the YATT plugin to create the landscape with one of Teper's heightmaps ...what a fabulous idea he had when he uploaded the heightmaps on the Vault!
I haven't decided if I will enter one or even three areas... wish me luck!
I am using the YATT plugin to create the landscape with one of Teper's heightmaps ...what a fabulous idea he had when he uploaded the heightmaps on the Vault!
I haven't decided if I will enter one or even three areas... wish me luck!
Subscribe to:
Posts (Atom)